Tuesday, March 8, 2011

Smoked Mozzarella Toast Breakfast


One of my favorite places to shop for groceries is Sunflower Market.  It used to be the place I shop for tidbits like dried apricots or peanut butter filled pretzels.  However, since I've been in charge of my own kitchen, it became the place I shop for cheap and fresh fruits.  Strawberries has been on sale for two weeks in a row.  I couldn't help getting a couple pounds of those babies of course.  One special spot I love to linger around looking for new finds is the cheese section.  They have a small basket filled with small leftover chunks of cheeses.  It is here that I found smoked mozzarella.  


I've always loved mozzarella, but smoked mozzarella was a first for me.  It was smoky, with a slightly browned outer layer.  Texture-wise it is similar to fresh mozzarella, except it's slightly more yellowish and has a full smoky flavor.  It lingered in my fridge for a couple of days, waiting for me to slice it up and do something with it.  I wanted to do something with it and strawberries, so here's my little adventure with it.  The result was a toast with crunchy sides and smoky, melty-cheesy center, accentuated with the sweetness of tomatoes and strawberries.

Tips:
1- When selecting strawberries, look for deeper colored ones with as little white areas around the top.
2- I used white bread slices, just because I had some that needs to be finished.  Whole wheat works just as great.
3- I served the toast along with a slice of smoked mozzarella on sunny-side-up egg, sauteed mushrooms, and tomato slices.  You decide what works for you :D
4- If you do now own a rolling pin, use the flat side of a big serving plate, or a big bottle works too.

Smoked Mozzarella Toast Breakfast

~1/4-lb smoked mozzarella, sliced
2 strawberries, washed, hulled, and sliced
4-6 slices of bread, crust removed
2 tbsp olive oil
1 roma tomato, sliced


Place a slice of bread on a flat surface and roll to flatten with a rolling pin.
Repeat to flatten all slices of breads.
Lightly brush the flattened bread with olive oil, and pan fry til lightly browned.
Place a slice of tomato over the center of the bread, then a slice of mozzarella, followed by a couple slices of strawberries.
Place the bread slices on a baking tray lined with aluminum foil.
Place the tray in the oven under low broiler setting for about 3 minutes or until cheese is slightly melted.
Serve while the toast is warm.


Wednesday, February 16, 2011

Pan-fried Glutinous Rice Cake Fans (Nian Gao/Tnee Kueh)


First of all, to all a belated
GONG XI FACAI 
恭喜发财
新年事事顺心顺意
新的一年新的希望, 新的开始,新的展向
念书的学业猛进
工作的步步高升
身体健康 龙马精神


This year, we celebrated Chinese New Year in Arizona with our family and friends who are living there.  As usual, I visited my aunt, and received glutinous rice cake as a gift.  Glutinous rice cake is made of glutinous rice flour.  In the olden days, they would actually have to soak the rice over night, then grind it the next day into a fine flour, or take it to the mill to be grounded, before making this sticky cake.  This is the Vietnamese version of glutinous rice cake, which I was not used to when I first moved to the States.  That's because my grandma used to make it herself and hers came out like bricks of dark, caramel colored jewels.  Oh, did I mention it always smells so, so wonderful when she's making em?  Oh, those good ol' days...

Having been gifted with a round of glutinous rice cake, I decided to do what my aunts do, pan-fry it with egg.  It's simple, it's sweet and slightly salty, it's chewy, and it's delicious too, although different from my grandma's.  And here's how...


Tips:
1- Any shape is great, just slice it about 1/4-inch thick so it doesn't have to cook as long.
2- Eat it while it's warm, because it won't be as chewy when it's cold.

Pan-Fried Glutinous Rice Cake Fans

Glutinous rice cake, sliced into 1/4-inch thick, and slightly triangular in shape
1 egg
Pinch of salt
A little oil for pan-frying (about 1-2 tbsp)


Heat some oil in a frying pan over medium-low heat.
While the pan is heating up, break an egg in a small bowl and lightly beat with a pinch of salt.
Dip and cover the glutinous rice cake slices in egg, and place in the hot frying pan.
Turn the glutinous rice cake slices over in the pan about 30 seconds later.
It is ready when the egg looks golden brown and the glutinous rice cake slices are soft and bounces back when you poke it with your spatula.
Serve hot!


Happy Chinese New Year again to all, and best of wishes to everyone in the coming year!!

Monday, February 14, 2011

Friday, January 14, 2011

Cranberry Sauce and Swedish Meatballs


We don't have cable TV at home.  Yup, we only watched four out of over 50 channels:   Discovery Channel, Food Channel, History Channel, and National Geographic Channel.  On top of that, the only time we watch TV is probably around meal time.  So we've cut off cable service.  Since then, PBS and Create are almost permanently on our TV when its on.  Well, except when we're watching our favorite dramas at night or during World Cup season.  hehe...  Anyway, when I was tuning in to Create one morning, I saw this lady making Swedish meatballs.  My mind instantly skidded to a halt in front of the blue and yellow building of Ikea.  Sadly, there are no Ikeas in Colorado, but not for long though.... heeeeh!  A new Ikea is coming to town this fall.  Yay!

Now, I haven't had Swedish meatballs for quite a while now, and was just missing it quite a bit.  The show must have read my mind.  Seriously!  Although, I must say that as I was getting ready to jot down the ingredients they used, I realized that the ingredients were (to me) "some" this and "a little" that.  I gave up trying to write anything down, and went online instead to look up some recipes.  I did finish watching the show to learn the basic process and techniques used for the dish.  After comparing some online recipes, I decided on Scandinavian Cooking's recipe.

Now, the other dilemma I had, was the sauce.  I like pairing the meatballs with lingonberry sauce.  Again, sadly, no Ikea, thus no lingonberry sauce.  sigh...  I was almost giving up and going to make a brown sauce for it instead, when Eureka!  Cranberries!  Cranberries went on sale after new year and I got a bag of it sitting in my fridge.  Gave myself a little imaginary pat on the back, and went straight to the kitchen, feeling pretty happy with myself.  Maybe even humming a happy little tune on the way down the staircase...

Tips:
1- You can either choose to pan fry it or oven bake the meatballs.  According to Scandinavian Cooking's article, pan frying will give you a "better result".  I baked them this time, and it came out pretty alright.
2- If you are baking, remember to adjust your baking time to complement your meatball size.  I made two batches, the first batch was about 1-1/4" in diameter and the second batch was smaller at about 3/4" diameter.  The first batch came out okay at about 13 minutes in the oven.  While the second batch, came out too dry because I forgot to readjust the baking time.
3- If you made too much, just freeze them up and save them in airtight containers or ziplock bags.  Heat up the meatballs when you need some Scandinavian Cooking suggests that the meatballs be reheated for 10-15 minutes at 375°F "in a single layer on an ungreased rimmed baking sheet".
4- Certain recipes will call for a mix of beef, pork, and/or veal.  You can decide on the types of mixture you prefer.  However, this meatball recipe is supposed to be quite tender.  So I would suggest trying to avoid using meats that are too lean.  
5- Using fresh bread as filler gives a pretty good result, so if you have some fresh breads, use those if you have them, otherwise, bread crumbs, flour, or mashed potatoes works too.
6- When baking, use a baking tray with rims, not baking sheets, because there will be some liquid bubbling out during the baking process.
6- If you're making them at the same time, start with the cranberry sauce, and while it's simmering and cooling down, make the meatballs.


Swedish Meatballs (slightly adapted from this recipe)

1lb minced meat (pork, beef, and/or veal)
1 egg
1/2 cup half and half (milk, cream, or water is also fine)
1 cup torn bread or mashed potatoes, or 1/2 cup bread crumbs or all purpose flour
pinch of salt and pepper to taste
1/2 onion, finely minced
mustard to taste (about 1/8 tsp)

Mix all ingredients together until well-mixed, then form into balls of about 1-1/2 inch diameter.
Pan fry over medium high heat in a little oil until browned on all sides.
Place the meatballs about 1 to 1-1/2 inch apart on parchment lined baking tray, and bake in 450°F oven for about 13 minutes.


Cranberry Sauce

1 bag  (12 oz) cranberries
1-3/4 cup sugar
1/3 cup water
1 cinnamon stick (~2 inches long)
1/4 tsp ground nutmeg
Rinds and juice from 1 orange
Combine all ingredients in a medium sauce pan.
Boil over medium high heat for about 2 minutes, stirring constantly.
Reduce heat to low, and simmer for about 10-15 minutes until thickened.
Remove from heat and cool on cooling rack.

Enjoy and hopefully you'll enjoy this recipe as much as I did ^.^

Thursday, January 6, 2011

Bak Kwa - Chinese BBQ Pork


[Updated on Feb 16, 2011:  Updated final baking time, see below
After making over 10 lb of bak kwa this past CNY, and having a chance to bake it at a friend's apartment as well, I had some enlightenment and realized that a couple more tips are in order as well as a slight change in baking time might yield better results.  The updates are all in light plum color and in italics. ]

Darling hubby and I proudly love our bak kwa.  Bak Kwa, Bak Kua, Chinese BBQ Pork, Chinese Pork Jerky, Yoke Gone, Rou Gan, Lung Yuk... Regardless of what you call it, its fragrance and flavor is addictive.  Its slightly sweet, slightly salty, moist yet chewy texture is nicely complemented by the addition of Chinese Rose Cooking Wine, 玫瑰露 (Mei Gui Lu or Mei Kuei Lu).


It has always been a luxury item.  At least it has always been so for me.  Although the ingredients are simple, the traditional process of making this delicacy is long and arduous.  My mom made it once when I was quite young.  I remembered helping her take it out to sun-dry, and retrieving it before it rains or when the sun sets.  Okay okay, grandma did most of that.  For days, this continued, until finally, she dragged out the charcoal and started BBQ-ing it.  Oh, it smelled heavenly!  Did I mention that she spent hours bbq-ing the batch?

Years after that, being in the States, bak kwa is hard to come by.  If you are lucky enough to find it in the Asian grocery store, be prepared to pay a high price for a few slices.  Being me, I did not have the heart to spend my hard earned money on just a few slices of this.  Thus, many of my day dreams consisted of bak kwa.

It wasn't until recently that a friend told me of a simple recipe that does not include days of sun-drying and hours of barbequeing.  Wooohoo!  The madness begins...  I made a few alterations from the original recipe(s) though.  


Tips:
1- The original recipe calls for cooking wine, but I remembered my mom using Mei Gui Lu.  It was that distinctive flavor of this particular chinese cooking wine that made the pork taste and smell so good.  So if you can find Mei Gui Lu, by all means, use it.  Otherwise, you can also substitute with any chinese cooking wine you have.
2- The original recipe called for plastic sheets or cling wrap to roll or press the meat down into a thin layer.  But I find using a spoon to do it was just as easy, less of a waste, and less things to clean.  (a big YES from me)
3- The original recipe used a pair of chopsticks to stir, but hey, I just used a spoon, it works too.  Again, less things to wash.  Yay!
4- Both Little Corner of Mine and Tazz in the Kitchen insisted that aluminum foils not be used because the meat will stick to it.  I followed the words of the wise, and so, no aluminum foils :)
5- Where I live, the weather is rather dry, and this dries out the cooked meat pretty quickly.  So an airtight container or cling wraps are helpful here.
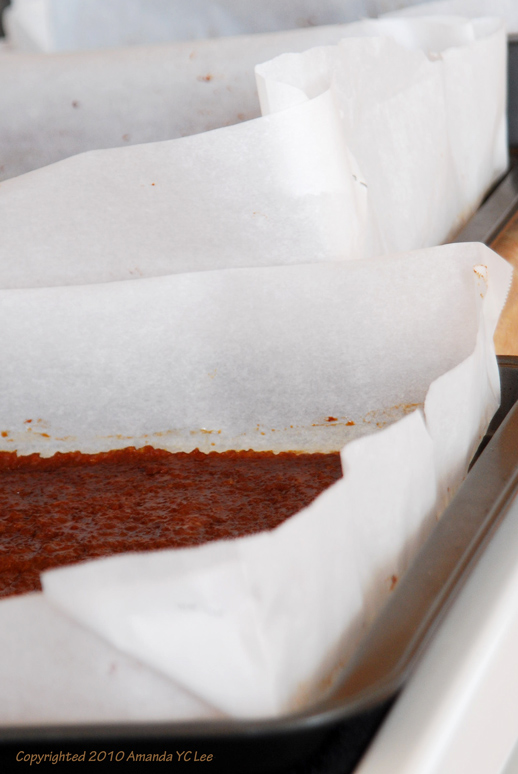
6- My first batch dirtied my oven like nothing else did.  It bubbled over.  So for the rest of the batches, I used a slightly larger sheet of parchment paper and stapled the corners up.  This seemed to work really well so far.
7- Depending on your oven, you might need slightly different baking time, do adjust slightly if you need to.
8- Try baking the trays in the middle of the oven, in one layer.  If that is not possible, do watch the trays, and switch the upper and lower trays around during the last 7 minutes of baking so that they brown more evenly.
9- If you managed to procure minced meat with more fat content, do omit or reduce the amount of oil used.  The minced meat I find at my local stores are rather lean, that was why I added oil to up the oil content.

Bak Kwa (Adapted from Little Corner of Mine and Tazz in the Kitchen)


1 lb. minced pork
1-1/2 tbsp fish sauce
1 tbsp dark soy sauce
1 tbsp light soy sauce
1 tbsp Chinese rose cooking wine (Mei Gui Lu)
1/2 cup sugar
1 tbsp oil

Line two medium sized baking sheet with parchment papers.
Place all ingredients in a big mixing bowl.
Stir with a spoon or pair of chopstick in one direction until gluey or well mixed.
Preheat oven to 255°F (125°C).
Spoon half of the meat mixture into each baking sheet.
Using the spoon, gently press on the meat until it is consistently about 1/8-inch thick.
Bake for 20 minutes.
Switch the oven temperature up to 355°F (180°C).
Continue to bake for about 15 minutes.
Retrieve the trays from the oven, and with the help of a pair of scissors and tongs, cut the meat from each tray into 6-8 pieces.
Flip the meat over (so that it bakes more evenly on both sides) and bake for another 10 minutes.
Remove trays from the oven and cool slightly, then immediately store in an airtight container or cover with clingwrap.
[Update:
While the oven is heating up to 355°F (180°C), proceed to cut the meat to the size you prefer, and flip it over so that the initial side that was facing upwards (rough side), is now facing down.
When the oven has reached 355°F (180°C), bake for about 8 minutes.
Then retrieve and flip it so that the rough side is now facing upwards.
Continue to bake for another 7 minutes or so, watching the batch for the last 3-4 minutes.
Remove trays from the oven and cool slightly, then immediately store in an airtight container or cover with clingwrap.]


Enjoy and hopefully this saves you tons of money!!  And if you tried making it and made any alterations that you love, I'd love to hear from you.  :)

Friday, December 31, 2010

Cardamom and Pear Bavarian Cream Cake


Happy Birthday (ahem, a little belated) to my sister Rachael!  She's always been the silly, cheeky one, while me the quiet one with a inner closet cheeky personality waiting to jump out.  She's the one who has the sweet sweet smile that I wish I have.  However, do not let that fool you, for she has a little devilish personality that's waiting to prank you if you're not careful.  I know it because I've been the victim of the pranks more times than I can count.  I love you regardless, and HAPPY BIRTHDAY AGAIN!   And HAPPY NEW YEAR TO ALL!!

Mmmph!  Having a mouth full of this baby had me closing my eyes, and going off to dreamy land for a moment.  At the first bite, you get blasted with the flavor of cardamom in the soft creamy Bavarian cream, followed by a subtle pear and orange combination from the pear slices and orange chiffon cake.  I melted alright!  It was just how I dreamed for it to be.  If I were standing, I would have done a Snoopy dance around the room.  Although, on second thought, it's a good thing I was sitting down, for I went weak in my knees eating this baby up.

I was introduced to cardamom the spice earlier this year by a friend who has recently moved back to India.  I miss you guys!  I think it was love at first sight for me with cardamom.  I've been dreaming of this cake for a couple months now.  Finally I got down to pencil and paper, scribbled out the recipe and then, all that's left was for the director in me to yell: "ACTION!"

I've been planning on getting the cake done for a party this weekend, but decided to try it out first and bring Black Forest Cake instead to the party.  After trying this cake, I decided that it's too good to keep it to myself and I just gotta gotta gotta share this with my friends.  Before they get to eat it though, you guys get to see it here! :D


Tips:
1- Gently crush the cardamom pods with the butt of a knife or in a mortar and pestle to release the flavorful seeds.
2- Before slicing the cake rounds, it helps to have a ruler and toothpicks around. Measure about 1/2 inch thickness and insert a toothpick into the cake as a marker.  Then using a sharp knife, or a serrated utility knife, cut the cake into rounds just right above the marker.
3- If you are new to cutting cake rounds, wrap the cake tightly in plastic wrap and freeze for about 12 hours before slicing.  This helps to harden the cake, and thus making the cutting action easier.
4- If you soak the pear rounds in salt water mixture, remember to rinse and pat dry quickly before cooking in milk.
5- If you don't have a plastic cake wrap, makeshift with a strip of parchment paper of at least 2"x20".  You can use clear tape to tape shorter pieces together.  Otherwise, use a 9" cake tin or spring-form cake pan for this purpose.
6- You can omit using the raspberries for decoration if you prefer.

Special thanks to Helene of Tartelette for her advise and recipe which I altered for the cardamom.

Cardamom and Pear Bavarian Cream Cake

2 D'Anjou Pears (one sliced into rounds, and the other sliced into thin wedges for decoration)
1 tbsp salt
1 cup water

1 9-inch orange chiffon cake (Recipe here)
6-12 raspberries for decoration
1 strip of plastic cake wrap, at least 2 inches high and 20 inches long

4 egg yolks
1/4 cup sugar
1-1/4 cup milk
2-3 cardamom pods, roughly crushed open
1 tbsp gelatine in 1/8 cup water
1 cup heavy cream

Cake preparation:
Cut orange chiffon cake into 1/2-inch thick rounds.
Reserve 2 rounds for this cake, and store the rest of the cake for another purpose.
---
Pear preparation:
Slice the pears into rounds and thin wedges.
Soak the wedges in water and salt mixture to stop it from turning brown.
Use the pear rounds immediately, otherwise, soak it in the salt water mixture until needed.


---
Bavarian Cream preparation:
Whisk egg yolks and sugar until very pale.
Meanwhile, in a large saucepan, bring the milk and cardamom pods to a boil over medium heat.
While the milk is warming up, place the sliced pear rounds into the milk for about 3 minutes, or until it looked slightly transparent.
Remove the pears from the milk.
When the milk boils, strain out the cardamom and measure out 1 cup of milk.
Continue beating the egg yolk mixture as you slowly pour the hot milk over the yolk.
Pour this yolk mixture back into the saucepan, and cook over low-medium heat until it coats the back of a spoon.
Remove the yolk mixture from heat and stir in the softened gelatine until it has completely melted.
Leave the yolk mixture to cool back down to room temperature.
Meanwhile, whip the heavy cream to soft peak, and fold it into the yolk mixture.
---
Cake assembly:
Place one 1/2-inch thick cake round on a large, flat plate.
Wrap the plastic cake wrap around the cake as tight as you can without smooshing the cake up.
Tape the plastic cake wrap together with a small piece of clear tape.
Before pouring the cream, reserve about 1 cup of the cream for later use.
Pour about 1/2 inch thick layer of the Bavarian cream onto the cake.
Place the raspberries against the plastic cake wrap.
Place a layer of sliced pear rounds on the cream.
Fill the cream to about 1 inch thick, and place another layer of sliced pear rounds on the cream.
Fill with the rest of the cream (not the reserved one cup)
Gently push in the other layer of the cake round on top of the cream.
Jiggle a little to push out the air and flatten it against the cream.
Using a spatula, spread the reserved, 1-cup Bavarian cream over the cake.
Arrange the pear wedges into a circular fan around the cake.
Chill the cake for at least 4 hours or until set.
Finally, cut up a slice and go "mmmm..." with your eyes closed, and join me in dreamy land.


Enjoy and here's to wishing all a Happy New Year!

Thursday, December 23, 2010

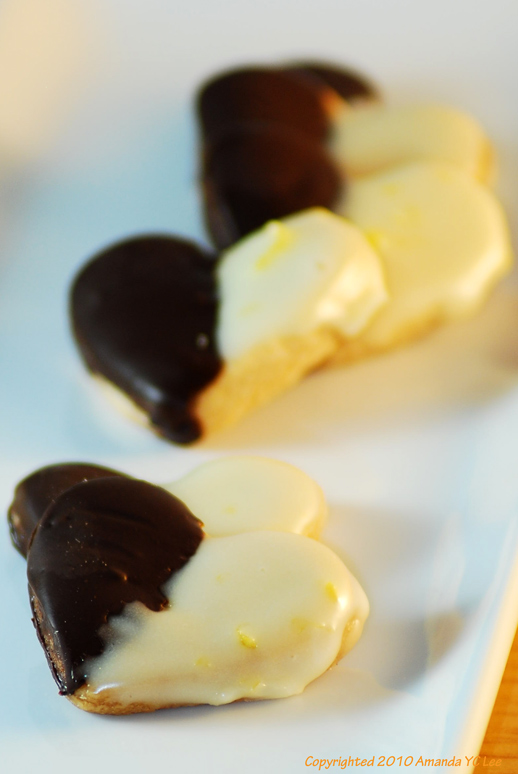
Chocolate Lemon Shortbread Cookies


Come December time, my kitchen often looks like a tornado just torn through it.  Well, at least that's how my darling hubby describes it.  Feels like it.  Looks like it.  I guess you can call it so.  Except, I'd like to call it my Tasmanian Devil just torn through the kitchen days.  This year, the days of destruction is less than last year's.  Mainly because for the last week or two, I've had to take out 3 of my teeth, and hadn't been able to eat whatever I want.  Baking up a storm doesn't help in a sense that I'd get to see but not eat.  So I did not bake much, until this week that is.  The Tasmanian devil has torn through my kitchen again.  Flour, castor sugar, powdered sugar, chocolate bits, melted chocolate, rolling pin, parchment papers...  Yup!  They covered my kitchen workspace alright.

One of my favorite website for looking up recipes is Joy of Baking.  I haven't really played with cookies until last year.  Yeah, I know, what was I thinking.  I guess I was going crazy with cakes?  Eeehhh...  So, anyway, last year I decided to bake a batch of little somethings for our friends and hubby's colleagues, and so I found something easy from the Joy of Baking website to start me off.  

This year, that was where I started my search as well. I started off with their recipe for shortbread cookies, but decided that it needs a little more "oomph" to it.  So, I ended up whipping up a lemon icing for the cookies.  YAY!  The lemon icing gives the slightly sweet cookie an edge of tartness.  Just perfect!  If you try this, do let me know how you like it ^.^

Tips:
1- You can prepare the dough ahead of time.  Wrapping it tightly then freezing it allows you to make your cookies anytime you want.  When you want to bake it, just leave the dough out at room temperature for about 5-10 minutes before rolling out and baking.
2- Playing: Dip the whole thing in chocolate, or the whole thing in lemon icing.  Hey, it's up to your own liking right? :)
3- When mixing the flour for the cookies, try not to over mix.  Slightly crumbly is okay, as long as you don't see flour pockets.  This will help improve the crispiness of the cookie.
4- I find that rolling out your dough between two sheets of parchment/wax papers is easier for me.


Chocolate Lemon Shortbread Cookies
Shortbread Cookies (recipes adapted from Joy of Baking)
1 cup unsalted butter at room temperature, cut into smaller pieces
1/2 cup powdered sugar
1 tsp vanilla extract
2 cups all-purpose flour
1/4 tsp salt

Using a paddle beater on your mixer, beat the butter until creamy and smooth.
Add in sugar and continue beating until smooth.
Add in vanilla extract and beat until well combined.
Add in the flour and mix until just combined.
Flatten out the dough to about 1 inch thickness on a plastic wrap.
Wrap it up tightly, and chill for at least an hour.
***At this point, you can freeze it until you need to bake***
Line two baking sheets with parchment papers.
Roll the dough between two sheets of parchment paper (wax paper works too) into 1/4 inch thickness.
Cut out your cookies with a cookie cutter, and line them up on your baking sheets.
Collect the rest of the dough into a ball, then repeat the rolling out and cutting until all the dough has been used.
Place your cut-out cookies in the refrigerator for about 15 minutes to help firm the dough before baking.  This will help the cookies to retain the shapes better.
Preheat the oven to 325°F (177°C) while the cookies are chilling.
Bake for about 8-12 minutes until lightly browned.
Remove from the oven, and cool on a cooling rack.

Chocolate Dip
 3/4 cup (4-5 oz) semi-sweet or bitter sweet chocolate, finely chopped
Place the chopped chocolates in a microwavable bowl.
Microwave on medium heat setting for 30 seconds.
Remove the bowl and stir.
Place the bowl back into the microwave for another 30 seconds, and repeat until you have a smooth melted chocolate.
At a 45° angle, dip half of the face of the shape in the melted chocolate.
Place it on a parchment paper to cool, about 10-15 minutes.  If you live in warmer climates, do cool them in the refrigerator.

Lemon Icing
1 cup powdered sugar
2-1/2 tbsp lemon juice
1 tsp lemon zest

Place all ingredients in a small bowl, and gently whisk with a fork until you have a smooth glaze that is thick, but pourable.
Dip the other half of the cookie, also at 45° angle, into the lemon icing.
Place it on a parchment paper to set, also about 10-15 minutes.


Good luck!  If you're traveling over the holidays season, do be safe.  Happy Holidays!