Showing posts with label Holiday. Show all posts

Wednesday, February 16, 2011

Pan-fried Glutinous Rice Cake Fans (Nian Gao/Tnee Kueh)


First of all, to all a belated
GONG XI FACAI 
恭喜发财
新年事事顺心顺意
新的一年新的希望, 新的开始,新的展向
念书的学业猛进
工作的步步高升
身体健康 龙马精神


This year, we celebrated Chinese New Year in Arizona with our family and friends who are living there.  As usual, I visited my aunt, and received glutinous rice cake as a gift.  Glutinous rice cake is made of glutinous rice flour.  In the olden days, they would actually have to soak the rice over night, then grind it the next day into a fine flour, or take it to the mill to be grounded, before making this sticky cake.  This is the Vietnamese version of glutinous rice cake, which I was not used to when I first moved to the States.  That's because my grandma used to make it herself and hers came out like bricks of dark, caramel colored jewels.  Oh, did I mention it always smells so, so wonderful when she's making em?  Oh, those good ol' days...

Having been gifted with a round of glutinous rice cake, I decided to do what my aunts do, pan-fry it with egg.  It's simple, it's sweet and slightly salty, it's chewy, and it's delicious too, although different from my grandma's.  And here's how...


Tips:
1- Any shape is great, just slice it about 1/4-inch thick so it doesn't have to cook as long.
2- Eat it while it's warm, because it won't be as chewy when it's cold.

Pan-Fried Glutinous Rice Cake Fans

Glutinous rice cake, sliced into 1/4-inch thick, and slightly triangular in shape
1 egg
Pinch of salt
A little oil for pan-frying (about 1-2 tbsp)


Heat some oil in a frying pan over medium-low heat.
While the pan is heating up, break an egg in a small bowl and lightly beat with a pinch of salt.
Dip and cover the glutinous rice cake slices in egg, and place in the hot frying pan.
Turn the glutinous rice cake slices over in the pan about 30 seconds later.
It is ready when the egg looks golden brown and the glutinous rice cake slices are soft and bounces back when you poke it with your spatula.
Serve hot!


Happy Chinese New Year again to all, and best of wishes to everyone in the coming year!!

Thursday, January 6, 2011

Bak Kwa - Chinese BBQ Pork


[Updated on Feb 16, 2011:  Updated final baking time, see below
After making over 10 lb of bak kwa this past CNY, and having a chance to bake it at a friend's apartment as well, I had some enlightenment and realized that a couple more tips are in order as well as a slight change in baking time might yield better results.  The updates are all in light plum color and in italics. ]

Darling hubby and I proudly love our bak kwa.  Bak Kwa, Bak Kua, Chinese BBQ Pork, Chinese Pork Jerky, Yoke Gone, Rou Gan, Lung Yuk... Regardless of what you call it, its fragrance and flavor is addictive.  Its slightly sweet, slightly salty, moist yet chewy texture is nicely complemented by the addition of Chinese Rose Cooking Wine, 玫瑰露 (Mei Gui Lu or Mei Kuei Lu).


It has always been a luxury item.  At least it has always been so for me.  Although the ingredients are simple, the traditional process of making this delicacy is long and arduous.  My mom made it once when I was quite young.  I remembered helping her take it out to sun-dry, and retrieving it before it rains or when the sun sets.  Okay okay, grandma did most of that.  For days, this continued, until finally, she dragged out the charcoal and started BBQ-ing it.  Oh, it smelled heavenly!  Did I mention that she spent hours bbq-ing the batch?

Years after that, being in the States, bak kwa is hard to come by.  If you are lucky enough to find it in the Asian grocery store, be prepared to pay a high price for a few slices.  Being me, I did not have the heart to spend my hard earned money on just a few slices of this.  Thus, many of my day dreams consisted of bak kwa.

It wasn't until recently that a friend told me of a simple recipe that does not include days of sun-drying and hours of barbequeing.  Wooohoo!  The madness begins...  I made a few alterations from the original recipe(s) though.  


Tips:
1- The original recipe calls for cooking wine, but I remembered my mom using Mei Gui Lu.  It was that distinctive flavor of this particular chinese cooking wine that made the pork taste and smell so good.  So if you can find Mei Gui Lu, by all means, use it.  Otherwise, you can also substitute with any chinese cooking wine you have.
2- The original recipe called for plastic sheets or cling wrap to roll or press the meat down into a thin layer.  But I find using a spoon to do it was just as easy, less of a waste, and less things to clean.  (a big YES from me)
3- The original recipe used a pair of chopsticks to stir, but hey, I just used a spoon, it works too.  Again, less things to wash.  Yay!
4- Both Little Corner of Mine and Tazz in the Kitchen insisted that aluminum foils not be used because the meat will stick to it.  I followed the words of the wise, and so, no aluminum foils :)
5- Where I live, the weather is rather dry, and this dries out the cooked meat pretty quickly.  So an airtight container or cling wraps are helpful here.
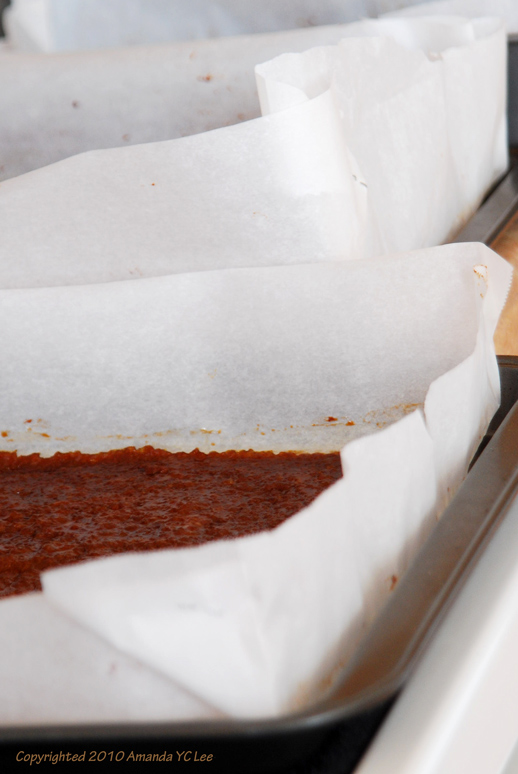
6- My first batch dirtied my oven like nothing else did.  It bubbled over.  So for the rest of the batches, I used a slightly larger sheet of parchment paper and stapled the corners up.  This seemed to work really well so far.
7- Depending on your oven, you might need slightly different baking time, do adjust slightly if you need to.
8- Try baking the trays in the middle of the oven, in one layer.  If that is not possible, do watch the trays, and switch the upper and lower trays around during the last 7 minutes of baking so that they brown more evenly.
9- If you managed to procure minced meat with more fat content, do omit or reduce the amount of oil used.  The minced meat I find at my local stores are rather lean, that was why I added oil to up the oil content.

Bak Kwa (Adapted from Little Corner of Mine and Tazz in the Kitchen)


1 lb. minced pork
1-1/2 tbsp fish sauce
1 tbsp dark soy sauce
1 tbsp light soy sauce
1 tbsp Chinese rose cooking wine (Mei Gui Lu)
1/2 cup sugar
1 tbsp oil

Line two medium sized baking sheet with parchment papers.
Place all ingredients in a big mixing bowl.
Stir with a spoon or pair of chopstick in one direction until gluey or well mixed.
Preheat oven to 255°F (125°C).
Spoon half of the meat mixture into each baking sheet.
Using the spoon, gently press on the meat until it is consistently about 1/8-inch thick.
Bake for 20 minutes.
Switch the oven temperature up to 355°F (180°C).
Continue to bake for about 15 minutes.
Retrieve the trays from the oven, and with the help of a pair of scissors and tongs, cut the meat from each tray into 6-8 pieces.
Flip the meat over (so that it bakes more evenly on both sides) and bake for another 10 minutes.
Remove trays from the oven and cool slightly, then immediately store in an airtight container or cover with clingwrap.
[Update:
While the oven is heating up to 355°F (180°C), proceed to cut the meat to the size you prefer, and flip it over so that the initial side that was facing upwards (rough side), is now facing down.
When the oven has reached 355°F (180°C), bake for about 8 minutes.
Then retrieve and flip it so that the rough side is now facing upwards.
Continue to bake for another 7 minutes or so, watching the batch for the last 3-4 minutes.
Remove trays from the oven and cool slightly, then immediately store in an airtight container or cover with clingwrap.]


Enjoy and hopefully this saves you tons of money!!  And if you tried making it and made any alterations that you love, I'd love to hear from you.  :)

Saturday, October 30, 2010

Spiced Pumpkin Cranberry Cupcake


Never liked pumpkin much.  Couldn't understand all the hoo-ha behind pumpkin pie, didn't understand what's so great about spiced pumpkin latte that comes out every fall at coffee stores.  For twenty over years, it stayed that way.  All it took was a cheesecake to change my mind. ^.^  Hehe...  A couple years ago, I had a slice of pumpkin cheesecake at a friend's place and that changed my mind about pumpkins.  Heeh


So this year, to start off this fall on a pumpkin-ish tone, I made spiced pumpkin cupcakes.  After grating my nutmegs, I went bonkers, and took out my mortar and pestle and started pounding my cinnamon and cloves into powder.  Yeah, I did went bonkers that night.  lol...


Tips: 
1- You don't have to pound cinnamon and cloves, but if you can, try grating your own nutmeg.  It smells so awesome and it's so easy, you'll do it again after you've tried it once.
2- Soaking your cranberries before mixing and baking helps to keep them moist and plump through the baking process.
3- This recipe is for about twenty 2-1/2 inch cupcakes.  If your muffin trays are larger or smaller, remember to adjust the baking time and check for readiness.


Spiced Pumpkin Cranberry Cupcake


Cupcake ingredients:
3/4 cup dried cranberries
1 cup water
2 tbsp brandy/kirsch
2 cup + 2 tbsp all-purpose flour
1/2 cup granulated sugar
1/2 cup brown sugar
1/4 tsp baking powder
1/2 tsp salt
1/2 tsp ground cinnamon
1/4 tsp ground cloves
1/4 tsp grated nutmeg
1/2 cup vegetable oil
2 large eggs
1-1/2 cup pumpkin paste

Cream cheese icing ingredients:
8 oz cream cheese, softened (1 pkt)
4 oz butter, softened
1-3/4 cup powdered sugar
1 tsp vanilla essence
a couple drops of red, yellow, and green food dye


Boil the cranberries in water and brandy/kirsch mixture for 5 minutes then switch off the fire and keep the cranberries soaking for about 10 minutes then drain.
Preheat oven to 350°F and line muffin tray with paper cups.
In a large mixing bowl, whisk together all the dry ingredients until well mixed.
Make a well in the center of the dry ingredients and add in the wet ingredients (oil, eggs, pumpkin paste).
Whisk together the wet ingredients and slowly draw in the dry ingredients until well mixed.
Stir in the cranberries.
Pipe or spoon the batter into paper cups and fill to about 3/4 full.
Bake for 25 minutes or until a cake tester inserted into the center of the cupcake comes out clean.
Cool on a rack for about 30 minutes.
Meanwhile, combine and cream all ingredients for icing. 
Mix a couple drops of food dye into part of the icing until you achieve the color you want.
Pipe or spread cream cheese icing on the muffin.

Oh, and have fun with the icing design.  ^.^


Good luck and hope you fall in love with pumpkins.  heehee
Oh, and yes, HAPPY HALLOWEEN!!!!!!!  Go get drunk on candies!